
Troubleshooting Common Issues in Injection Molding
By Ichiplas Process Engineering Team · Mar 2024 · Updated Nov 2026 · Reviewed by the Ichiplas engineering team
Injection molding is a versatile manufacturing process, but defects can arise due to material properties, tooling design, or process parameters.
A Beginner-friendly Guide to Handling Defects
Running large-scale production processes can be challenging. We share our experience in identifying common defects in injection molding, their causes, and practical solutions to ensure high-quality parts and efficient production.
For Plastic Injection Manufacturing
Most Common Defects
- A. Short Shots
- Description:The cavity doesn't fill completely, leaving the part with missing or incomplete features — usually at the end of the flow path or in thin sections.
- Causes:
- Insufficient shot size or injection pressure
- Melt or mold temperature too low, so the flow front freezes early
- Trapped air from inadequate venting
- Walls too thin for the flow length, or gate too small
- Solutions:
- Increase shot size, injection pressure and injection speed
- Raise melt and mold temperature within the material's recommended range
- Add or clean vents at the last-to-fill areas
- Enlarge the gate or relocate it closer to thin sections
- Thicken walls or shorten the flow length at the design stage
- B. Sink Marks
- Description:Shallow depressions on the surface, typically opposite thick sections such as bosses, ribs and wall junctions.
- Causes:
- Thick sections that keep shrinking after the surface has solidified
- Insufficient packing pressure or hold time
- Gate freezing off before the part is fully packed
- Melt or mold temperature too high
- Solutions:
- Increase packing pressure and hold time
- Enlarge the gate so it stays open longer during packing
- Lower melt temperature and improve cooling near thick sections
- Core out thick areas and keep ribs to 40–60% of wall thickness
- C. Warpage
- Description:The part twists, bows or curls out of shape after ejection because different areas shrink by different amounts.
- Causes:
- Non-uniform wall thickness
- Uneven cooling between mold halves or across the part
- Fiber orientation in glass-filled materials
- Ejecting the part before it has cooled enough
- Solutions:
- Keep wall thickness uniform and transitions gradual
- Balance mold temperature between the cavity and core
- Optimize gate location to even out flow and fiber orientation
- Increase cooling time, or use a cooling fixture for large flat parts
- D. Flash
- Description:Thin, unwanted fins of plastic at the parting line, around ejector pins or at shut-offs.
- Causes:
- Clamp force too low for the part's projected area
- Injection or packing pressure too high
- Worn or damaged parting line and shut-off surfaces
- Melt temperature too high, making the plastic too fluid
- Solutions:
- Reduce injection and packing pressure, or switch to pack earlier
- Confirm the press has enough clamp tonnage for the part
- Repair or re-fit the parting line and shut-off faces
- Lower melt temperature within the recommended range
- Check vents are not too deep for the material
- E. Silver Streaks
- Description:Silvery lines appear on the part surface, often due to moisture in the raw material. This defect is most common in hygroscopic materials like nylon.
- Causes:
- Excess moisture in raw material
- Mold cooling system leaks introducing moisture
- Improper mold temperature
- Solutions:
- Dry raw material to a moisture content of 0.02%
- Use dehumidifier systems for thorough drying
- Inspect and repair mold cooling system leaks
- Maintain proper mold temperature
- F. Burn Marks (Diesel Effect)
- Description:Black or brown marks caused by trapped air being superheated (up to 600–800°C) during injection.
- Causes:
- Insufficient venting
- High injection speed creating air compression
- Solutions:
- Add proper venting through parting line vents, ejector pin vents, or porous venting pins
- Avoid reducing injection speed, as it can compromise part quality. Instead, optimize venting
- G. Weld Lines
- Description:Visible lines where two flow fronts meet, creating potential weak points.
- Causes:
- Poor flow front angle
- Low mold temperature or high pressure drop
- Insufficient part wall thickness
- Solutions:
- Optimize flow front meeting angles to ~135°
- Increase mold temperature to recommended levels
- Increase gate size to reduce pressure drop
- Ensure proper wall thickness for material
- Consider using flow leaders or relocating gates
- While weld lines cannot be completely eliminated, they can be minimized with these adjustments
- H. Ejector Pin Marks
- Description:Visible marks left on parts due to inadequate ejection mechanisms.
- Causes:
- Insufficient ejector pins
- Poor draft angles or surface finish
- Inadequate cooling
- Solutions:
- Add sufficient ejector pins proportionate to part area
- Include proper draft angles to facilitate smooth ejection
- Polish surfaces in the ejection direction
- Implement proper cooling lines
- Use block or stripper plate ejection for large or delicate parts
- Size ejector pins appropriately for the load
- I. Gate Blush
- Description:White or gray marks around the gate area, typically 3–5mm wide.
- Causes:
- Material shearing in the gate area
- Solutions:
- Optimize gate design, such as using a submarine gate with higher volume
- Calculate and maintain proper shear rates
- Maintain recommended mold and melt temperatures
- Avoid quick process fixes that compromise quality
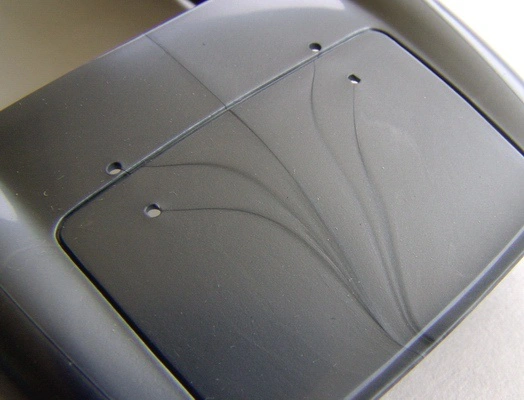
- J. Record Grooves/Finger Marks
- Description:Circular grooves or marks caused by inconsistent material flow.
- Causes:
- Pressure drops in the feed system
- Improper gate design or wall thickness
- Solutions:
- Optimize gate size and design for uniform flow
- Maintain consistent injection pressure
- Ensure adequate wall thickness to avoid weak spots
- Control mold temperature to ensure even flow
- K. Molded-In Stress
- Description:Internal stress within the part, leading to warping or cracking.
- Causes:
- Slow filling causing material cooling before full cavity fill
- Overpacking or excessive mold pressure
- Cold mold temperatures or sharp corners
- Improper ejection methods
- Solutions:
- Fill quickly to maintain melt temperature
- Avoid overpacking by adjusting packing pressure and time
- Maintain mold temperature within material recommendations
- Use proper ejection methods to avoid deformation
- Add radii to sharp corners to reduce stress concentration
- Preheat inserts to match mold temperature
- L. Nozzle Effects
- Description:Issues related to nozzle configuration and maintenance.
- Causes:
- Improper nozzle diameter matching
- Inadequate heater coverage
- Poor temperature control
- Rough internal surfaces
- Insufficient maintenance
- Solutions:
- Match nozzle diameter to the machine head
- Ensure proper heater coverage (80–90% of the nozzle's surface area)
- Use independent temperature control for precision
- Maintain smooth internal surface finishes
- Regular maintenance to prevent clogging or wear
- Understand material specifications to match equipment settings
- Pre-dry materials thoroughly to avoid moisture defects
- Use equipment sized appropriately for the part and material
- Implement proper tool design with adequate runners and venting
- Maintain all equipment regularly
- Select a screw design compatible with the material's characteristics
Defect Quick Reference
Start here to narrow down a defect, then see the detailed causes and fixes above.
| Defect | What it looks like | Most likely cause | First thing to try |
|---|---|---|---|
| Short shot | Part not completely filled | Insufficient shot size, pressure or venting | Increase shot size and injection speed; check vents |
| Sink marks | Dimples opposite thick sections | Thick sections, low pack pressure or time | Increase pack pressure and time; core out thick areas |
| Warpage | Part twisted or bowed | Uneven cooling or wall thickness | Balance mold temperature; even out walls |
| Flash | Thin fins at the parting line | Low clamp force or worn parting line | Reduce pressure; check clamp tonnage; repair shut-offs |
| Silver streaks (splay) | Silvery streaks from the gate | Moisture in the resin | Dry material to the supplier's specification |
| Burn marks | Black or brown marks at end of fill | Trapped air (poor venting) | Add or clean vents |
| Weld lines | Lines where flow fronts meet | Low melt or mold temperature, gate position | Raise temperatures; move gate or add venting |
| Ejector pin marks | Shiny or raised marks inside | Insufficient draft or ejection area | Add draft and pins; improve cooling |
| Gate blush | Dull halo around the gate | High shear at the gate | Enlarge or redesign the gate; slow first-stage injection |
| Molded-in stress | Cracking or later warping | Slow fill, over-packing, cold mold | Fill faster; reduce pack; raise mold temperature |
Frequently Asked Questions
What are the most common injection molding defects?
The defects seen most often are short shots, sink marks, warpage, flash, silver streaks (splay), burn marks, weld lines, flow marks and ejector pin marks. Most can be traced to one of four sources: part design, mold design, material condition or process settings.
How do I tell whether a defect is caused by the design, the mold or the process?
A defect that appears in the same place on every part and doesn't respond to process changes usually points to part or mold design — for example sink opposite a thick boss. A defect that varies from shot to shot, or improves when temperatures, pressures or drying are adjusted, is usually a process or material issue. A good molder works through the process first, then proposes design or mold changes.
What causes sink marks and how do you fix them?
Sink marks form when thick sections keep shrinking after the surface has solidified, pulling the surface inward. Short-term fixes are higher pack pressure, longer hold time and lower melt temperature. The permanent fix is design: core out thick sections, keep ribs to 40–60% of wall thickness, and gate into the thickest area.
What causes short shots?
Short shots happen when the cavity doesn't fill completely, usually because of too little shot volume, low injection pressure or speed, melt or mold temperature that is too low, trapped air from poor venting, or walls that are too thin for the flow length.
How do you stop a molded part from warping?
Warpage comes from uneven shrinkage. Keep wall thickness uniform, balance cooling between the two mold halves, optimize gate location so flow and fiber orientation are even, and allow enough cooling time before ejection. Glass-filled and semi-crystalline materials need particular care because they shrink differently along and across the flow.
Why is my part brittle?
Brittleness is commonly caused by moisture in hygroscopic materials such as nylon, PC or PBT that weren't dried properly, by material degradation from excessive melt temperature or residence time, by too much regrind, or by molded-in stress. Check drying records and barrel temperature first.
Why Choose a Johor Bahru-Based Manufacturer like Ichiplas?
Johor Bahru is a hub for high-quality and cost-effective plastic injection molding services. Local manufacturers leverage advanced technologies and proximity to key markets, ensuring timely delivery and competitive pricing. With expertise in handling diverse materials, manufacturers in Johor Bahru are equipped to meet both small and large-scale production needs.
Troubleshooting injection molding issues requires a combination of understanding material behavior, proper tool design, and precise process control. By addressing common defects like short shots, sink marks, warpage, flash and weld lines with the solutions outlined here, manufacturers like Ichiplas can ensure consistent part quality and efficient production.
Contact us today to discuss your plastic injection molding needs, or if you are thinking of moving your manufacturing base to Malaysia!
Get Free Quote
Contact us today to learn more about our services and how we can help you with your next project.